Canalblog
Suivre ce blog Administration + Créer mon blog

jeuxkiff

Archives
Publicité
Visiteurs
Depuis la création 17 069
17 octobre 2012

How do I install YSMenu?

To install TTMenu and YSMenu for DSTT, I recommend that you make a backup of your microSD card, reformat it using the Panasonic formatter, then follow these directions carefully:

  1. Make sure you have the newest version of YSMenu (see above for directions on how to obtain it), and the unofficial (fake-killer disabled) menu and updated "extinfo.dat", "savlib.dat", and "infolib.dat" files
  2. Replace "extinfo.dat", "savlib.dat", and "infolib.dat" that are in the "TTMENU" folder of the menu with the latest updates.
  3. Place the "TTMENU" folder onto your microSD card.
  4. Unzip the YSMenu archive.
  5. Create a folder named "YSMenu" on your microSD card.
  6. Place a copy of the fake-killer-disabled "TTMENU.DAT" into the same folder as the "ttextract.exe" program on your PC. Run "ttextract.exe" on your PC. Place the two resulting files ("ttdldi.dat" and "ttpatch.dat") into the "YSMenu" folder on your microSD card.
  7. (a) If you want YSMenu to be your default menu, rename "TTMENU.DAT" to "TTMenu.nds" and place it onto the root (top level) of your microSD card. Then place a copy of "YSMenu.nds" onto the root of your microSD card. Then make a copy of "YSMenu.nds" named "TTMENU.DAT" on the root of your microSD card. You should now have "TTMenu.nds", "YSMenu.nds", and "TTMENU.DAT" (a copy of "YSMenu.nds") on the root of your microSD card.
    (b) If you want TTMenu to be the default menu, place a copy of "TTMENU.DAT" onto the root (top level) of your microSD card. Then place a copy of "YSMenu.nds" onto the root of your microSD card. Then make a copy of "TTMENU.DAT" named "TTMenu.nds" on the root of your card. You should now have "TTMENU.DAT", "YSMenu.nds", and "TTMenu.nds" (a copy of "TTMENU.DAT") on the root of your microSD card.
  8. Optional: place the skin files "YSMenu1.bmp" and "YSMenu2.bmp" (these don't come with YSMenu) into the "YSMenu" folder. Here's a simple NDS skin: http://filetrip.net/f2763-YSMenu-NDS-Skin.html
  9. Edit "YSMenu.ini". Place a semi-colon in front of the line that says "LITERALS=LITERALS_JPN". Remove the semi-colon from the line that says "LITERALS=LITERALS_ENG". Save your changes to "YSMenu.ini" and place it into the "YSMenu" folder on your microSD card.
  10. Make a new folder named "games" and put a few .nds files in it. Always use the "safely remove hardware" utility before removing your microSD card from your PC. Place the DSTT into the NDS, place the microSD card into the DSTT, and turn on the NDS.

That should be it. If you are using TTMenu as your default, simply run "YSMenu.nds" to get to YSMenu. Otherwise, it should launch directly into YSMenu and you can run "TTMenu.nds" to get back to TTMenu.

When you're done, you should have the following files and folders on your microSD card:

YSMenu.nds (YSMenu)
TTMenu.nds (TTMenu)
TTMENU.DAT (a copy of whichever of the above two you want as your default menu)

YSMENU (YSMenu firmware folder)
YSMenu.ini (YSMenu init file)
ttdldi.dat (extracted from the official loader using ttextract.exe)
ttpatch.dat (extracted from the official loader using ttextract.exe)
YSMenu1.bmp (optional skin)
YSMenu2.bmp (optional skin)
TTMENU (unofficial firmware folder)
all the files from the unofficial TTMENU folder are here
games (games folder)
your .nds files go here
Publicité
Publicité
17 octobre 2012

What is YSMenu and where do I get it?

YSMenu is a homebrew menu for the DSTT and Acekard 2 by Yasu. It has several advantages over the official menu, including the ability to sort games alphabetically, the ability to navigate folders, and the ability to load GBA games to a slot2 expansion cart straight from the menu (without the need of a separate loader such as GBA ExpLoader).

Yasu doesn’t want anyone to link to any pages other than his home page. Yasu’s home page is http://home.usay.jp/. It's mostly in Japanese, but to get YSMenu, follow these directions:

  1. Click the "ETC" button in the main menu near the top beneath the title.
  2. Select "Nintendo DS" (second item) from the table.
  3. Search for "DS(T_T)DS" (CTRL-F) or just scroll about 2/3 of the way down until you see the heading in blue.
  4. There is a scrollable text area beneath that heading. Select the first item in the scollable list to download the latest version.
17 octobre 2012

How can I alphabetize my games in the menu?

The easiest and fastest way to sort your roms (takes about 20 seconds):

  1. Create a new folder at the root of your microsd card named "games2".
  2. Go into your "games" folder (or wherever you keep your .nds files).
  3. Do a "select all" then "cut" (CTRL-A, CTRL-X).
  4. Go to your new "games2" folder.
  5. Do a "paste" then "select all" then "cut" (CTRL-V, CTRL-A, CTRL-X).
  6. Go back to your (now empty) "games" folder.
  7. Do a "paste" (CTRL-V).
  8. Delete your "games2" folder.

Since none of the files are actually moving off of your microSD drive, they cut/paste very quickly (it really only updates the filenames in the file table).

There are also programs such as DriveSort that can do it, but these sometimes corrupt your microSD card. DriveSort is available here: http://www.anerty.net/software/file/DriveSort.php

17 octobre 2012

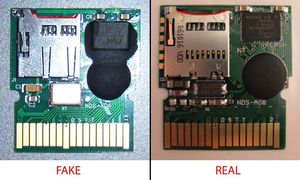
How can I tell if I have a fake or a real DSTT?

There are three ways to tell if your DSTT is a fake:

1) Get the DsttFlashChecker program, install it on your microSD cart, and run it. Sometimes the program can't recognize your chip, in which case you'll have to use one of the other ways (see below). Sometimes this program will also return a false negative (will tell you that you have a real flash cart when it's really a fake). Newer fakes are better at disguising themselves as the real thing, and will trick the DsttFlashChecker program into reporting a false negative. Note that in order to run the DsttFlashChecker program, you should install the fake-killer disabled firmware in order to avoid possibly destroying your fake with the official fake-killer firmware. You can find DsttFlashChecker.nds here: http://filetrip.net/f3692-DSTT-Fake-Recovery-1-17.html

2) Newer DSTT models snap together, but older models are glued shut and are difficult to open without destroying it (and you'll need to glue it back together when you're done). If you have a newer model, open up your DSTT and compare it to the pictures here: http://www.ndstt.com/anti_fake.html

3) It's difficult but possible to tell from the outside without opening the case by examining the microSD holder (the metal thing that holds the microSD cart inside the microSD slot on the DSTT). The front edge of the SD holders are curved on the real ones while the fakes are all straight. Here's what the holders look like:

20121017008

Note that there are batches of DSTT's coming out that have plastic microSD holders. It is unclear whether or not these are real or fake (the DSTT team has not responded with a definitive answer) but they are probably real. But just to be safe, do NOT install the official (fake-killer) firmware on these flash carts. Here's what the platic microSD holder looks like (the holder can be on the right or the left):

20121017009

17 octobre 2012

Can't reformat my microSD card, even using the Panasonic formatter. What should I do?

Occasionally a microSD card will get corrupt and you cannot reformat it using your PC. In these cases, you can usually format it using a cell phone or digital camera. Once you've formatted it, follow these rules carefully to avoid corruption:

  • Always leave some free space on your microSD card for save files and system files.
  • Always put games into your "games" folder. Leave as few files as possible on the root of your microSD card.
  • Always use "safely remove hardware" to remove your microSD card from your PC.
  • Use the Panasonic formatter if you ever have to reformat.
  • Don't use the official TTMENU.DAT unless you're absolutely sure you have a real DSTT because it contains fake-killer code.
Publicité
Publicité
17 octobre 2012

What the mean of the a little red or blue icon of a microSD card with a face?

This icon means that you don't have a microSD card in your DSTT or that your microSD card isn't formatted:


This icon means that your DSTT cannot find the menu (the menu isn't installed correctly, or there is a problem with your microSD card):
20121017005

This icon means that your DSTT or microSD card may have a hardware problem:
20121017006

This icon indicates that your DSTT is loading normally:
20121017007

17 octobre 2012

I am certain that I have a real DSTT and I want to install the official menu (TTMenu). How do I do it?

The official menu is terribly outdated, and it is highly recommended that you use the unofficial (fake-killer disabled) firmware (see above) which is compatible with far more games. The official menu contains fake-killer firmware, so do NOT install it unless you know for a fact you have a real DSTT. If there is a question, use the instructions at the top of the FAQ to install the fake-killer-disabled firmware instead (it works just fine on a real or a fake DSTT). To install the official TTMenu (complete with fake-killer firmware) on a real DSTT:

  1. Download the firmware from http://www.ndstt.com/new_download.html
  2. Unzip the firmware archive. It should have a file named "TTMENU.DAT" and a folder named "TTMENU" (which will contain a bunch of files). Drag "TTMENU.DAT" and the "TTMENU" folder onto your microSD card.
  3. Make a new folder on your microSD card called "games."
  4. Put one or two .nds files into the "games" folder.
  5. Remove the microSD card from your PC. Make sure you always use the "safely remove hardware" to remove the microSD card.
  6. Insert your DSTT into your NDS. Insert the microSD into your DSTT. You should get to a menu with your games in it. Click on a game to run it.
  7. Always keep the following in mind:
    • Always leave some free space on your microSD card for save files and system files.
    • Always put games into your "games" folder. Leave as few files as possible on the root of your microSD card.
    • Always use "safely remove hardware" to remove your microSD card from your PC.
    • Use the Panasonic formatter if you ever have to reformat.
    • Keep a backup of all the files that are on your microSD card. Backup your .sav files often.
    • Don't use the official TTMENU.DAT unless you're absolutely sure you have a real DSTT because it contains fake-killer code.
17 octobre 2012

My DSTT used to work, but doesn't work any more. What should I do?

If you're pretty sure that your DSTT wasn't destroyed by fake-killer firmware (if you know yours is real or if you haven't run the official firmware on it), try the steps under "How do I set up my DSTT/microSD card?" If it still doesn't work, your DSTT may have been killed by the fake-killer firmware.

If your DSTT may have been destroyed by fake-killer firmware, try these steps:

  1. Backup the files on your microSD card, and use the Panasonic formatter to reformat your microSD card.
  2. Grab the unofficial (fake-killer disabled) menu and updated "extinfo.dat", "savlib.dat", and "infolib.dat" files
  3. Replace "extinfo.dat", "savlib.dat", and "infolib.dat" that are in the "TTMENU" folder of the menu with the latest updates.
  4. Copy the "TTMENU" folder and "TTMENU.DAT" and "TTMENU.SYS" files to your microSD card.
  5. Grab DsttFlashChecker/DsttFlashWriter from here: http://filetrip.net/f3692-DSTT-Fake-Recovery-1-17.html
  6. Copy "DsttFlashChecker.nds", "DsttFlashWriter.nds", and "DSTTDUMP.BIN" to your microSD card.
  7. Make a folder named "games" on your microSD card. Copy 2 or 3 games (.nds files) to the new "games" folder.
  8. Run "safely remove hardware", select your microSD reader in the list, and press STOP before removing your microSD card from your PC.
  9. Insert your DSTT into the NDS. Insert your microSD card into the DSTT. Turn on the NDS.
  10. Run the DsttFlashChecker program to see if you have a real or a fake DSTT. If you have a fake DSTT and suspect that it may have been destroyed by the official fake-killer firmware, run the DsttFlashWriter program to re-flash your DSTT. Note: if your flash cart was destroyed by the fake-killer firmware, it may take several tries before you can get it to boot up or run DsttFlashWriter. In some cases, it won't run at all, in which case you'll need to install "DsttFlashWriter.nds" and "DSTTDUMP.BIN" onto a working flash cart (it doesn't have to be a DSTT), run DsttFlashWriter and then remove the working flash cart and insert the killed DSTT before doing the restore (WARNING: if you don't switch them, you could potentially destroy your working flash cart).
  11. You should be able to run your games now. You can delete "DsttFlashChecker.nds", "DsttFlashWriter.nds", and "DSTTDUMP.BIN" from your microSD card if you want.
  12. Always keep the following in mind:
    • Always leave some free space on your microSD card for save files and system files.
    • Always put games into your "games" folder. Leave as few files as possible on the root of your microSD card.
    • Always use "safely remove hardware" to remove your microSD card from your PC.
    • Use the Panasonic formatter if you ever have to reformat.
    • Keep a backup of all the files that are on your microSD card. Backup your .sav files often.
    • Make sure you don't use the official "TTMENU.DAT" (particularly if you have a fake) because it contains fake-killer code.

If the above doesn't work, you probably have a hardware problem. It could be your microSD card reader, your microSD card, or your DSTT. Try using a different microSD card reader. If that doesn't work, try a different microSD card. If that doesn't work, you should return your flash cart where you got it from. There is no good way to fix a contact or other hardware problem, but if you have a contact problem sometimes paper or cardboard inserted alongside the back of the DSTT can help push the DSTT towards the NDS contacts and can help them make better contact.

17 octobre 2012

How do I set up my DSTT/microSD card?

To set up your (possibly fake) DSTT for the first time, follow these directions:

  1. Backup the files on your microSD card, and use the Panasonic formatter to reformat your microSD card.
  2. Grab the unofficial (fake-killer disabled) menu and updated "extinfo.dat", "savlib.dat", and "infolib.dat" files
  3. Replace "extinfo.dat", "savlib.dat", and "infolib.dat" that are in the "TTMENU" folder of the menu with the latest updates.
  4. Copy the "TTMENU" folder and "TTMENU.DAT" and "TTMENU.SYS" files to your microSD card.
  5. Make a folder named "games" on your microSD card. Copy 2 or 3 games (.nds files) to the new "games" folder.
  6. Run "safely remove hardware", select your microSD reader in the list, and press STOP before removing your microSD card from your PC.
  7. Insert your DSTT into the NDS. Insert your microSD card into the DSTT. Turn on the NDS.
  8. You should see a menu with your games, and you should be able to run your games now. Always keep the following in mind:
    • Always leave some free space on your microSD card for save files and system files.
    • Always put games into your "games" folder. Leave as few files as possible on the root of your microSD card.
    • Always use "safely remove hardware" to remove your microSD card from your PC.
    • Use the Panasonic formatter if you ever have to reformat.
    • Keep a backup of all the files that are on your microSD card. Backup your .sav files often.
    • Make sure you don't use the official "TTMENU.DAT" (particularly if you have a fake) because it contains fake-killer code.
10 octobre 2012

R4 SDHC et EZ Flash

Le R4 SDHC est la première carte média pris en charge 8 Go de départ une course folle de ceux qui voulaient exploiter son potentiel. Ces cartes mémoire haute acceptées, mais le temps de chargement est un peu plus lente à 6 à 8 secondes. Cependant, avec le temps, cela a été rénovée et le temps de chargement a été réduit à environ 4 minutes. Les consoles de la R4i SDHC et R4 SDHC sont à peu près similaires et compatibles avec la DSi et DSi XL de la part de Nintendo. C'est l'accessoire ultime pour DSi qui a littéralement tout et la carte flash dans la ville nouvelle avec des caractéristiques merveilleuses.

L'EZ Flash est une autre carte qui est entièrement compatible avec la DSi v1.4 avec support complet pour toutes les fonctionnalités. Coûte environ 30 dollars il s'agit d'une carte économique pour toutes les fonctionnalités qu'il offre. Le flash EZ est livré avec une interface très similaire à la PDA de pointe qui est élégant et attrayant. Il est facile d'utiliser un logiciel aussi. La nouvelle DSi et la vieille grosse NDS deux sont bons pour le EZ Flash. La technologie de ces cartes flash de sorte que vous n'avez pas besoin de fichiers de patch, utilisez des codes d'authentification ou de flasher votre système plus.

Il utilise un slot vraiment avancé 1 technologie qui permet de connecter très facilement. Ainsi, vous pouvez cesser de s'inquiéter de l'application de correctifs et plus de soins sur vos jeux préférés et ce qui est publié dans les derniers cercles de jeux homebrew. Vous pouvez maintenant ramasser les meilleurs d'entre eux, de les télécharger et de se divertir. Le flash EZ possède quelques caractéristiques de puissance emballés d'accès multimédia qui signifie qu'il n'y a pas d'autres limites de contraintes d'espace sur ce que vous pouvez emporter partout avec vous et ce que vous ne pouvez pas.

L'un des pionniers de l'industrie des cartes flash, la fiabilité, la performance et la facilité d'utilisation du flash EZ est ce qui est en fait l'un des meilleurs disponibles. Cela améliore vos expériences de jeu à des limites vous n'avez jamais été au courant de avec le soutien incroyable et le service. Il a une solution entièrement compatible NDS ce qui le rend tout aussi génial avec les unités de Nintendo plus anciens, comme le tout premier modèle de la Nintendo DS et DS Lite pour les dernières unités DSi, qui ont accaparé les marchés. Ces haute capacité, haute vitesse, des cartes hautement compatibles sont réellement redéfini le point culminant de cartes flash et multimédia et d'expériences de jeux.

Pour trouver plus d'informations sur le flash ez et résoudre toutes les questions concernant la R4 SDHC, visitez le site Web

Publicité
Publicité
1 2 3 4 > >>
Publicité